Tuesday, September 8, 2009

Invisible Love

Tube of choice
I have used Zindy S. D. Nielsen
She sells her beautiful tubes HERE
FTU Scrapkit - Invisible by Zanie

Template 84 by Rachel HERE


Open Template 84
Shift + D to duplicate
Close the original template
Right click on the copyright layer and delete
Repeat delete process for brush left, brush right and Grey Strip
Highlight your Black Rectangle layer
Selection - Select All
Selections - Float
Selections - Defloat
Selections - Modify - 2
Open SC_INVISIBLE_PAPER23
Right click - copy
Back on your template
Right click - Paste - Paste into selections
Selections - select none

Highlight BlueSquareL
Selection - Select All
Selections - Float
Selections - Defloat
Selections - Modify - 2
Open SC_INVISIBLE_PAPER16
Right click - copy
Back on your template
Right click - Paste - Paste into selections
Selections - select none

Highlight BlueSquareR
Selection - Select All
Selections - Float
Selections - Defloat
Selections - Modify - 2
Open SC_INVISIBLE_PAPER16
Right click - copy
Back on your template
Right click - Paste - Paste into selections
Selections - select none

Highlight White Frame1
Selection - Select All
Selections - Float
Selections - Defloat
Selections - Modify - 2
Open SC_INVISIBLE_PAPER11
Right click - copy
Back on your template
Right click - Paste - Paste into selections
Selections - select none

Effects - 3d Effects - Drop Shaddow
Use these settings :
-2, 2, 100, 10, black

Highlight Frame Left
Selection - Select All
Selections - Float
Selections - Defloat
Selections - Modify - 2
Open SC_INVISIBLE_PAPER11
Right click - copy
Back on your template
Right click - Paste - Paste into selections
Selections - select none
Effects - 3d Effects - Drop Shaddow
Use these settings :
-2, 2, 100, 10, black
Highlight Frame Right
Selection - Select All
Selections - Float
Selections - Defloat
Selections - Modify - 2
Open SC_INVISIBLE_PAPER11
Right click - copy
Back on your template
Right click - Paste - Paste into selections
Selections - select none
Effects - 3d Effects - Drop Shaddow
Use these settings :
-2, 2, 100, 10, black

Hide all word art

From the scrap kit right click and copythe bow SC_INVISIBLE_53
Image - resize - 75
Repeat resize
Place at the bottom of frames
Effects - 3d Effects - Drop Shaddow
Use these settings :
-2, 2, 100, 10, black

From the scrap kit right click and copy the heart SC_INVISIBLE_23
Image - resize - 25
Place at the bottom of frames
Effects - 3d Effects - Drop Shaddow
Use these settings :
-1, 1, 100, 0, black

Right click on this raster layer - duplicate
Image - Mirror

From the scrap kit right click and copyt he heart SC_INVISIBLE_27
Image - resize - 25
Image - resize - 59
Place at the bottom right of frames
Right click on this raster layer - duplicate
Image - Mirror
I chose not to use the word art but would look with it as well.

At this point add any copyright and licensing informationThis tutorial was written by Rose Foster on 09/8/09Any similarity to any other tutorial is purely coincidentalAny creations you make following this tutorial is yours to do with as you pleaseas long as there is no profit made.This tutorial is not to be copied or passed around.


Thursday, August 27, 2009

Lorenzo Di Mauro

I have to give a shout out to Lorenzo's Forum
If you are not part of this awesome group you should be!!
Tons of fun and if you participate you have a chance to win some free tubes
A huge September Contest starting soon so hurry and join!


Tuesday, August 18, 2009

Let Freedom Ring


Tube of choice
I have used Steve Baier
He sells his tubes at
http://www.upyourart.com/
FTU Scrapkit - Wench Design_StarsAndStripesBlogTrain
HERE

Mask of ChoiceI used WSL-Mask 92
You can get this HERE under downloads

Open a 500 x 500 canvas
Open your mask and tube and minimize them

Copy and paste paper10
Image - resize - 65
Right click on raster layer - new mask - from image -WSL_Mask92
Right click - merge group
Right click - duplicate
Right click - Merge down

Copy and paste Frame1Image - resize - 40
Copy and paste paper10Image - resize - 40
Move this layer below your frame layer
Use your magic wand and click inside frame
Selections - modify - expand - 4
Selections - invert
On the paper layer click on delete on your keyboard
Selections - none

Copy and paste Star3
Image - resize - 25
Effects - 3D Effects - Drop Shaddow
Use these settings-2, 2, 100, 0, Black
Place on the left hand side of the frame

Copy and paste Flower4
Image - resize - 7
Place in the middle of the star
Effects - 3D Effects - Drop Shaddow
Use these settings0, 0, 100, 4, Black

Add tube of choice

At this point add any copyright and licensing information
This tutorial was written by Rose Foster on 08/18/09Any similarity to any other tutorial is purely coincidentalAny creations you make following this tutorial is yours to do with as you please as long as there is no profit made.This tutorial is not to be copied or passed around.


Sunday, August 9, 2009

Movie Star


Tube of choiceI have used
Anthony Guerra
You can purchase his awesome work at CILM

FTU Scrapkit - Wench Design_AtTheMoviesBlogTrain


Mask of ChoiceI used WSL-Mask 250
You can get this HERE under downloads

Open a 500 x 500 canvas
Open your mask and tube and minimize them

Copy and paste paper4

Right click on raster layer - new mask - from image -WSL_Mask250
Right click - merge group

Effects - 3D Effects - Drop Shaddow
Use these settings
-1, 1, 100, 0, Black

Copy and paste Frame13
Image - resize - 23
Copy and paste KeyChain1
Image - resize - 23

At this point I used a closeup that came with the tube.

If you chose to use a close up
Copy and paste your closeup tube
Move this layer below your frame
Use your magic wand and click inside frame
Selections - modify - expand - 2
Selections - invert
On the close uplayer click on delete on your keyboard
Selections - none
On your close up layer
Right click - properties
Change your opacity to 25

Copy and paste RibbonWrap5
Image - resize - 12
Place where you desire

Copy and paste Bow4
Use the same resize as the Ribbon
Effects - 3D Effects - Drop Shaddow
Use these settings
-1, 1, 100, 0, Black
Copy and paste flower3
Resize the same as above
Place flower in the middle of the bow

Add tube of choice

At this point add any copyright and licensing information

This tutorial was written by Rose Foster on 08/9/09
Any similarity to any other tutorial is purely coincidental
Any creations you make following this tutorial is yours to do with as you please
as long as there is no profit made.This tutorial is not to be copied or passed around.


Thursday, August 6, 2009

Perrrfection


This tutorial is going to be a bit different.
I am using ONLY the scrapkit

The kit I am using is a
PTU Scrapkit - Wench Design_WildAndFeisty
You can purchase it

Open a 500 x 500 canvas


Copy and paste Paper19


Copy and paste Tiger4
Image - resize - 75
Right click - properties - opacity - 50


Copy and paste Frame10
Image - resize - 50


Using your magic wand tool
Click INSIDE your frame


Selections - modify - expand - 4


Selections - invert


Highlight your paper layer - hit delete
Highlight your tiger layer - hit delete


Selections NONE


On your frame layer
Right click - duplicate


On the original frame
Adjust - Blur - Gaussian Blur
Radius - 10


Copy and paste Tiger6
Image - resize - 75
Repeat resize
Place at bottom of frame


Copy and paste ribbon4
Image - resize - 50
Place at the top of frame
Effects - 3D effects - drop shaddow
Use these settings
-1, 1, 100, 0 Black

Copy and paste Flowers3
Image - resize - 50
Repeat resize


At this point add any copyright and licensing information
This tutorial was written by Rose Foster on 08/6/09
Any similarity to any other tutorial is purely coincidental
Any creations you make following this tutorial is yours to do with as you please
as long as there is no profit made.This tutorial is not to be copied or passed around.


Wednesday, August 5, 2009

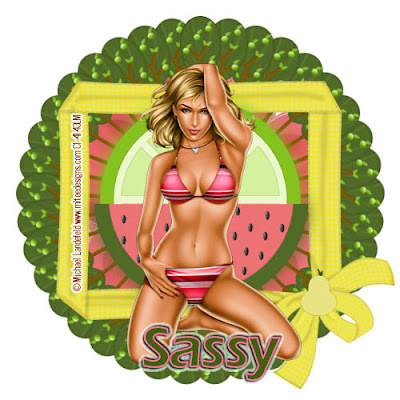
Summer Beauty


Tube of choice


I have used

Michael Landefeld
You can purchase his awesome work at CILM

PTU Scrapkit - Wench Design_SummerFruitsTagger

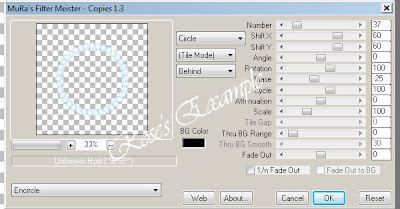
Mura's Meister - Copies


Open a 500x500 canvas

Copy and paste Flower2

Copy and paste Tree4
Image - resize - 50
Repeat resize

Apply MuRa's Meister - Copies with the following settings:


Right click - rename -Trees


Copy and paste Lime1
Image - resize - 50

Copy and paste Watermelon1
Image - resize - 50
Place so that the straight edge is across the middle of the lime.
Merge these two layers together
Right click - rename BkFruits


Right click - duplicate
On the duplicate layer
Right click - rename - Fruit1


On the BkFruits layer
Adjust - Blur - Gaussian Blur
Radius - 10
Merge these two layers together
Position in the middle of the tree circle you made


Copy and paste Frame7
Image - resize - 60
Move frame right above your tree layer

Place your tube where you feel looks best


At this point add any copyright and licensing information
This tutorial was written by Rose Foster on 08/5/09
Any similarity to any other tutorial is purely coincidental
Any creations you make following this tutorial is yours to do with as you please
as long as there is no profit made.This tutorial is not to be copied or passed around.


Tuesday, August 4, 2009

All Tied Up


Tube of choice
I have used
Anthony Guerra
www.Guerrafineart.com
You can purchase his awesome work at CILM
PTU Scrapkit - Wench Design_PurpleLove


HERE
Mask of ChoiceI used WSL-Mask 251


You can get this HERE under downloads


Open a 500 x 500 canvas

Open your mask and tube and minimize them

Copy and paste paper6
Image - resize - 75

Right click on raster layer - new mask - from image -WSL_Mask251
Right click - merge group

Copy and paste frame4
Image - resize - 75

Copy and paste bow2
Image - resize - 50
Repeat

Effects - 3D Effects - Drop Shaddow
Use these settings
-1, 1, 100, 0, White

Effects - 3D Effects - Drop Shaddow
Use these settings
1, -1, 100, 0, White

Place the bow to one side of the frame
Add a drop shaddow if desired
Right click on the bow raster - duplicate
Image - mirror

Copy and paste staple
Place at the top of frame....or where you desire

Copy and paste HeartPendant
Image - resize - 50
Repeat

Using your eraser tool
Erase one side of the rope at the top of pendant
Making it look as if it is hanging from the staple

Add tube of choice and wording of choice

At this point add any copyright and licensing information
This tutorial was written by Rose Foster on 08/4/09
Any similarity to any other tutorial is purely coincidental
Any creations you make following this tutorial is yours to do with as you please
as long as there is no profit made.This tutorial is not to be copied or passed around.